How to Clean Air Fryer: Complete Guide
Editor, IBRAHIM KHALIL ( Author Bio )
How to Clean Air Fryer: Complete Step-by-Step Guide for a Spotless Air Fryer with expert tips
In This Article
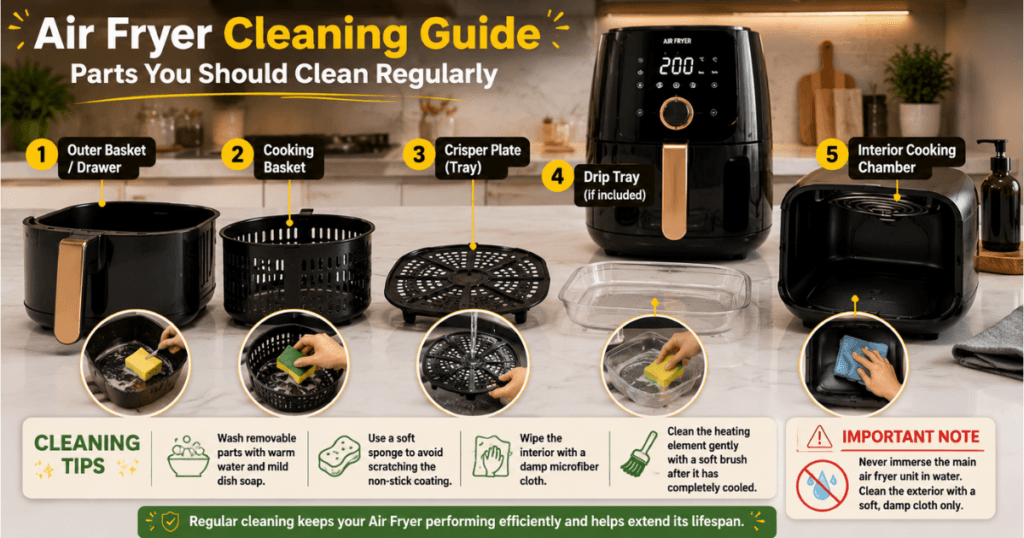
Introduction
Most people love their air fryer — until they open the drawer and get hit with the smell of last week’s fish tacos baked into every crevice.
If you know how to clean an air fryer properly, that never happens. This means you take care of your air fryer. A clean air fryer cooks better, lasts longer, and doesn’t fill your kitchen with smoke every time you preheat it.
Grease buildup on the heating element is one of the most common reasons air fryers start smoking — and it’s completely preventable with regular maintenance.
This guide covers everything: the weekly quick clean, deep-cleaning very dirty baskets, safely tackling the heating element, and brand-specific tips for the Ninja.
Whether you’ve been neglecting yours for weeks or just want to build a better routine, you’ll find exactly what you need here.
Quick Answer
Quick Answer: To clean an air fryer, unplug it and let it cool completely. Remove the basket and tray and wash them with warm soapy water or in the dishwasher if they’re dishwasher-safe.
Wipe the interior with a damp cloth, gently clean the heating element with a soft brush, and wipe the exterior dry. Regular cleaning after every use prevents grease buildup, odors, and smoke.
Why Cleaning Your Air Fryer Is Important
Skipping regular air fryer maintenance is like skipping oil changes on your car — it works fine for a while, until it doesn’t.
Preventing smoke: Grease drips accumulate at the bottom of the air fryer and on the heating coil. Every time you cook, that residue heats up and burns, producing smoke and an unpleasant smell. One good cleaning session fixes it immediately.
Removing odors: Cooked-on food residue retains odors. Garlic, fish, and heavily seasoned proteins are the worst offenders. Without cleaning, those aromas transfer to everything you cook next — including your brownies.
Improving cooking performance: A clean air fryer allows hot air to circulate efficiently. Clogged vents and a greasy basket actually reduce airflow, which means your food cooks less evenly and takes longer. Clean appliances cook better — it’s that simple.
Increasing lifespan: Non-stick coatings degrade faster when grease is left to bake onto the surface repeatedly. Regular cleaning protects that coating, which keeps the basket performing like new for years instead of months.
Food safety benefits: Old grease and burnt food particles are a bacterial growth risk, especially if the air fryer sits unused for days between uses. Cleaning after every use keeps things safe.
What You Need Before Cleaning an Air Fryer
You don’t need specialty products. Everything on this list is probably already in your kitchen.
Item | Purpose |
Soft sponge | Scrubbing removable parts without scratching non-stick surfaces |
Dish soap | Cutting through grease on the basket and tray |
Microfiber cloth | Wiping the interior, exterior, and heating element area without leaving lint |
Soft brush (old toothbrush works) | Reaching tight corners and the heating element coils |
Baking soda | Creating a gentle abrasive paste for stubborn, baked-on grease |
Warm water | Soaking and rinsing removable parts |
What NOT to use
What NOT to use: Steel wool, abrasive scrubbers, bleach, aerosol sprays, or any product with harsh solvents. These damage the non-stick coating and can leave chemical residue on cooking surfaces.
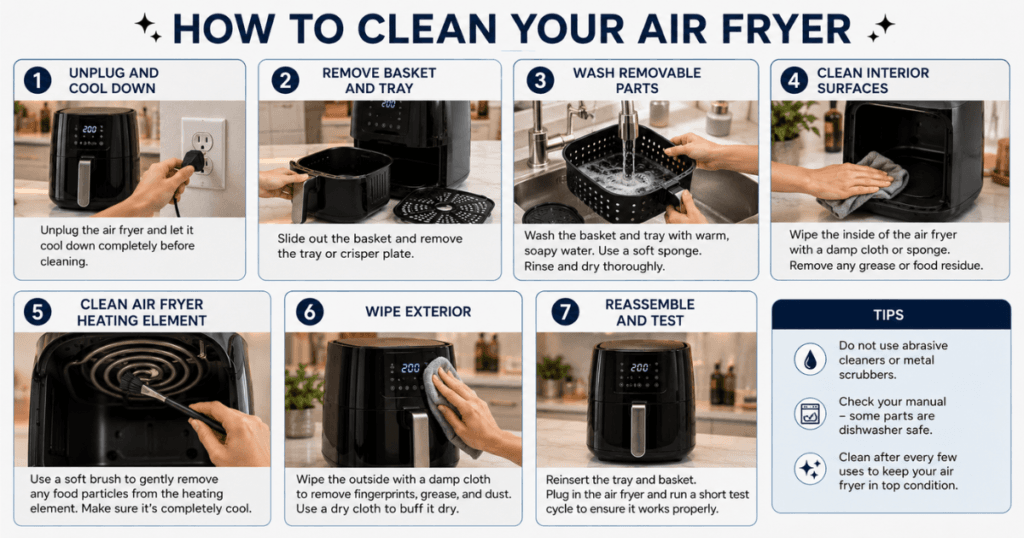
How to Clean Air Fryer (Step-by-Step)
Step 1: Unplug and Cool Down
This is non-negotiable. Never clean a hot air fryer — the heating element retains heat long after the cooking cycle ends, and attempting to clean it while warm risks burns and damage to the surfaces you’re cleaning.
Unplug the unit and wait at least 30 minutes after the last use. For a deep clean after heavy cooking, give it a full hour.
Step 2: Remove Basket and Tray
Pull out the basket and the drip tray beneath it. Most models release with a button on the handle — press it to separate the basket from the outer drawer. Check your manual if they’re stuck; forcing them apart can damage the release mechanism.
Take these parts to the sink. If there’s standing grease or liquid in the tray, pour it out before washing — don’t let it run into your drain in a large volume.
Step 3: Wash Removable Parts
Fill your sink with warm water and add a generous squeeze of dish soap. Submerge the basket and tray and let them soak for 10–15 minutes. This softens cooked-on food and makes scrubbing almost effortless.
Use your soft sponge to scrub both sides of the basket and the tray surface. For any spots that don’t budge, move to the deep-clean section below.
Rinse thoroughly under running water and let the parts air-dry completely before reassembling. Trapped moisture inside the drawer can cause odor and in rare cases, rust on the metal components.
Step 4: Clean Interior Surfaces
With the basket removed, look inside the air fryer chamber. Use a slightly damp microfiber cloth to wipe down the walls and the bottom of the cavity. For sticky spots, add a small amount of dish soap to your cloth.
Important: Use “damp” — not wet. You don’t want water dripping into the base of the unit near the heating components. Wring your cloth out thoroughly before each wipe.
If there’s burnt residue on the bottom of the interior, make a paste with baking soda and a few drops of water. Apply it to the spot, let it sit for 5 minutes, then wipe away with your damp cloth. It lifts burnt food residue without scratching.
Step 5: Clean Air Fryer Heating Element
This is the step most people skip — and the main reason air fryers start smoking. See the dedicated section below for a full breakdown. The short version: flip the unit upside down, use a soft brush to gently sweep away any buildup from the coils, and wipe carefully with a barely-damp cloth.
Step 6: Wipe Exterior
Dampen a microfiber cloth and wipe down the outside of the unit — the handle, control panel, and sides. For the touchscreen or digital display, use a dry or barely-damp cloth only. Excess moisture can seep into the electronics.
Stubborn fingerprints or grease splatters on the exterior respond well to a tiny drop of dish soap on the cloth. Wipe, then follow with a dry pass to prevent streaking.
Step 7: Reassemble and Test
Once every part is completely dry, reassemble the basket and drawer and slide it back into the unit. Plug the air fryer back in and run it empty at 350°F for 3–5 minutes. This burns off any soap residue and confirms everything is functioning correctly.
If you smell burning during this test run, that’s usually a small amount of residual moisture or soap evaporating — it should clear within a minute or two. If it persists, wipe down the interior again and repeat.
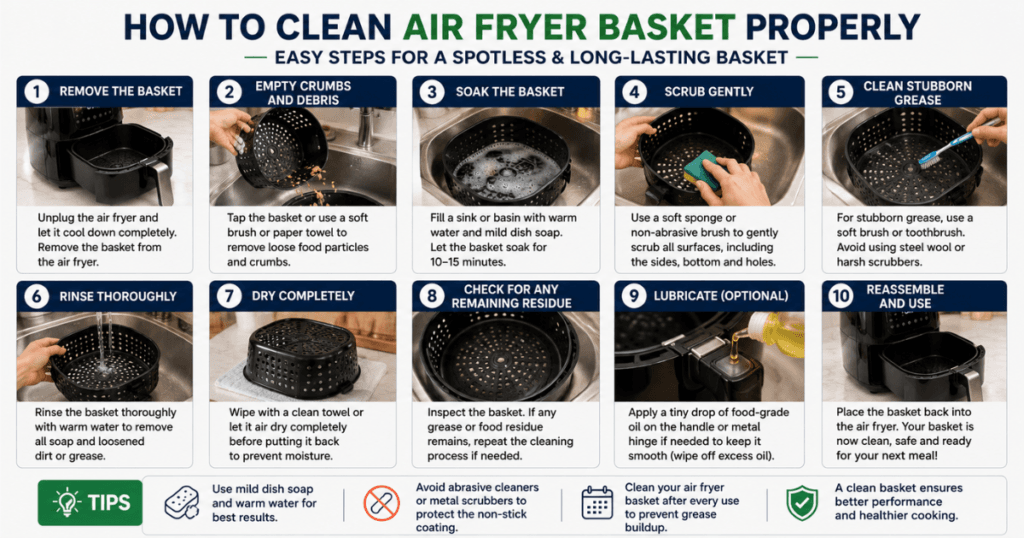
How to Clean Air Fryer Basket Properly
The basket is the part that takes the most abuse — direct contact with food, fat dripping through the mesh, proteins sticking to the surface. Here’s how to handle it based on what you’re working with.
Non-stick baskets: These are the most common and the most fragile. The non-stick coating scratches easily, so soft sponges only.
Abrasive scrubbers will strip the coating, causing it to flake into your food over time. Soaking in warm soapy water is your best friend — it does the work so you don’t have to scrub hard.
Dishwasher-safe baskets: Many manufacturers label their baskets as dishwasher-safe, but there’s a catch. Repeated dishwasher cycles break down the non-stick coating faster than hand washing.
If you want your basket to last, hand washing is the better long-term choice even when the dishwasher is technically an option. If using a dishwasher, place the basket on the top rack and select a gentle cycle.
Hand washing method: Warm water, dish soap, 10–15 minutes of soaking, soft sponge. That’s the routine. Rinse thoroughly and allow it to air dry before reinserting.
Removing baked-on grease: Make a paste of equal parts baking soda and dish soap. Apply it directly to the affected area with an old toothbrush, let it sit for 15–20 minutes, then scrub gently and rinse.
This combination is remarkably effective on baked-on grease without damaging the surface underneath.
Learning how to clean an air fryer basket correctly makes the biggest difference in how long your appliance performs well.
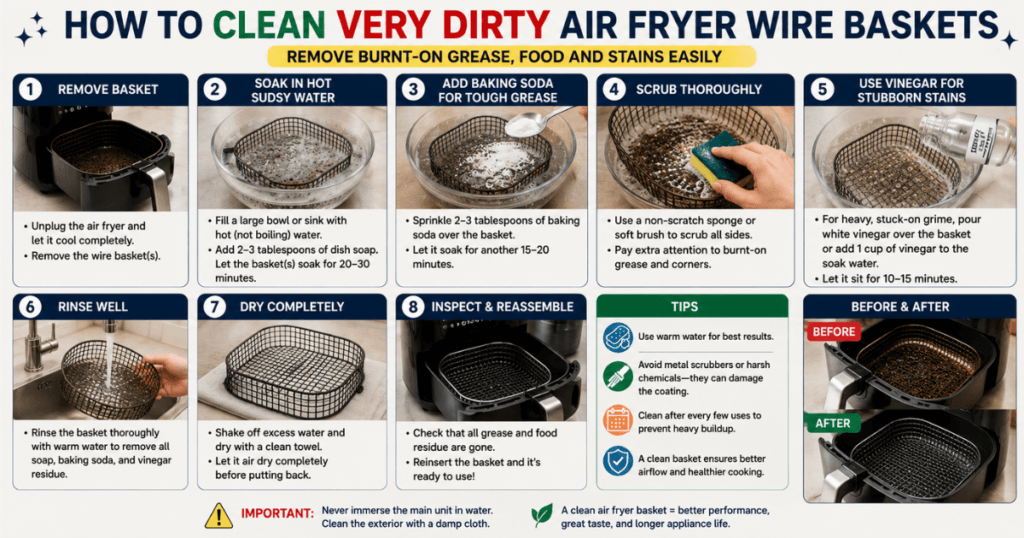
How to Clean Very Dirty Air Fryer Wire Baskets
Wire mesh baskets — common on toaster-oven-style and larger capacity models — collect grease differently than flat non-stick surfaces.
The grease works its way into every gap in the mesh and carbonizes into a hard crust. Here’s how to deal with it.
Soaking method: This is the foundation of any deep clean for Air Fryer Wire Baskets Fill a large bowl or plug your sink and add very hot water with a generous amount of dish soap.
Fully submerge the basket and let it soak for 30–60 minutes. For heavily neglected baskets, soak overnight in hot soapy water — this alone dissolves a surprising amount of buildup.
Baking soda paste: After soaking, drain the water and apply a thick paste of baking soda and warm water directly to the wire mesh. Work it into the crevices with an old toothbrush. Allow it to sit for 10–15 minutes before scrubbing.
Baking soda is mildly abrasive and chemically effective against grease — it actually breaks down the fatty acids rather than just pushing them around.
Degreasing techniques: Commercial degreasers like Dawn Platinum or similar heavy-duty dish soaps are significantly more effective than standard dish soap on wire baskets with serious carbon buildup. Spray or apply directly, let it penetrate for 5–10 minutes before scrubbing.
Stubborn carbon buildup: For dark carbon deposits that won’t shift with baking soda alone, try a paste of cream of tartar mixed with water. Apply it to the carbonized spot, let it sit for 20 minutes, then use a toothbrush to scrub in small circular motions.
Rinse thoroughly. This is one of the most effective natural approaches for how to clean very dirty air fryer wire baskets without resorting to harsh chemicals.
For truly extreme cases — baskets that haven’t been cleaned in months — you may need two or three soak-and-scrub cycles. Don’t expect one pass to do everything.
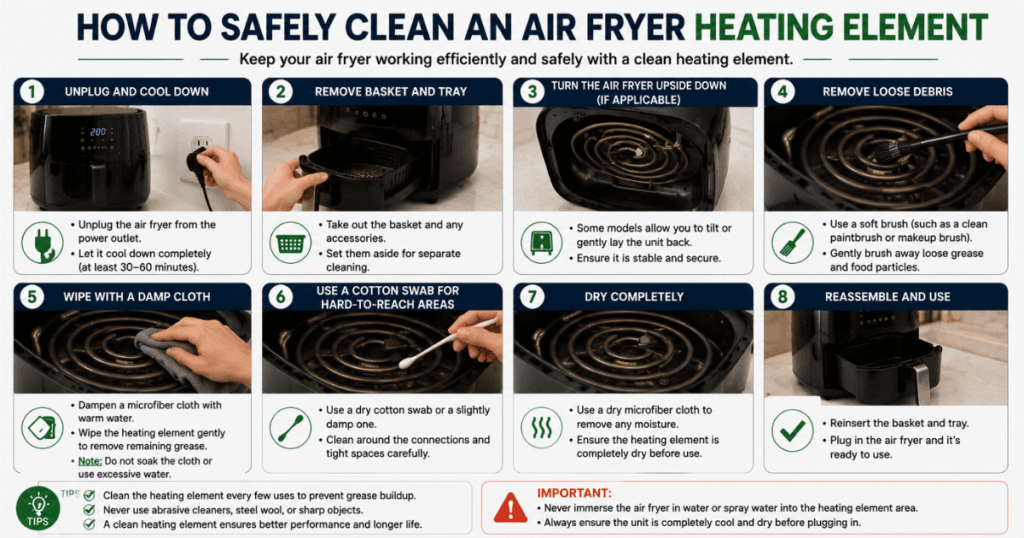
How to Safely Clean an Air Fryer Heating Element
The heating element is the coil or element mounted at the top of the air fryer chamber (inside, above where the basket sits).
It’s the source of heat, and when grease splashes up from cooking, it lands directly on those coils and bakes on.
Why grease accumulates: Foods with higher fat content — chicken thighs, bacon, cheese — release grease that spatters upward during high-heat cooking. Over time, this builds into a layer of burnt, carbonized residue that smokes every time it reheats.
Safe cleaning process:
- Ensure the unit is unplugged and fully cooled — at minimum 30 minutes, ideally longer.
- Turn the air fryer upside down so you can access the heating element from below.
- Use a soft-bristled brush (an old toothbrush is ideal) to gently sweep loose debris off the coils. Work carefully — don’t bend or press on the coils.
- For stuck-on grease, dip the brush very lightly in warm water with a drop of dish soap. Brush gently over the affected areas.
- Follow with a microfiber cloth that’s barely damp — wipe away any loosened residue and soap.
- Let the element air-dry completely (at least 20–30 minutes) before plugging the unit back in.
Mistakes to avoid:
- Never spray water, vinegar, or any other liquid directly onto the heating element.
- Never use metal tools or abrasive materials on the element
- Never clean the element while the unit is plugged in
- Avoid soaking any cloth you use — wringing it out to near-dry is essential
Frequency of cleaning: The heating element doesn’t need attention after every single use. Once a month is sufficient for regular users. If you cook high-fat foods frequently, clean it every two to three weeks.
Knowing how to clean an air fryer heating element properly is what separates people whose air fryers smoke from those who don’t.
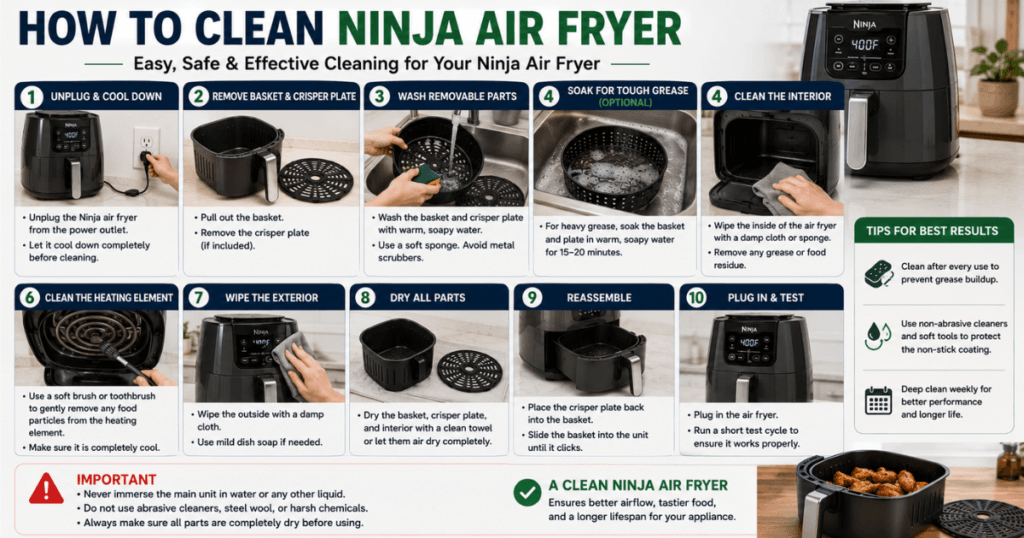
How to Clean Ninja Air Fryer
Ninja is one of the most popular air fryer brands in the United States, and their models have a few specific characteristics worth knowing before you start cleaning.
Ninja basket models (single-basket): The standard Ninja air fryer basket is ceramic-coated or has a non-stick finish. It’s durable but not invincible — avoid metal utensils and abrasive scrubbers.
Ninja officially states most of their basket models are top-rack dishwasher-safe, but as with all non-stick cookware, hand washing extends the coating’s lifespan considerably. Soak, wash gently with a soft sponge, rinse, and dry.
Ninja dual-zone models (Ninja Foodi DualZone and similar): These have two separate baskets that cook independently. Clean them separately — both baskets need the same soaking and gentle scrubbing treatment.
The divider between the two zones can collect grease at the seam, so use your toothbrush to work into that gap specifically.
Non-stick coating precautions: Ninja uses a ceramic-based non-stick coating on many models. It’s more durable than traditional PTFE coatings but still vulnerable to high-alkaline cleaners and abrasives. Avoid dishwasher pods (high pH) and stick to standard dish soap.
Cleaning frequency: Ninja recommends cleaning after every use — the basket and tray after each cook, with a more thorough interior and element cleaning monthly.
Given how often most Ninja owners use theirs, this is practical advice. A quick post-cook wash takes under five minutes once it becomes a habit.
To clean a Ninja air fryer heating element, follow the same upside-down, soft-brush method described above.
The heating element position is consistent across Ninja’s line — top-mounted, accessible from underneath when inverted.
Common Air Fryer Cleaning Mistakes
These are the habits that shorten appliance lifespan and lead to damaged coatings and disappointing results.
- Using metal scrubbers or steel wool: These scratch and permanently damage non-stick coatings. Once scratched, the surface can flake into food and will never cook the same way again.
- Using too much water inside the unit: Excess moisture near the electrical components is a safety hazard and can cause internal corrosion. Always use a damp cloth, never a wet one.
- Using abrasive chemical cleaners: Oven cleaner, bleach, and harsh degreasers are too aggressive for air fryer surfaces. They strip coatings and leave chemical residue on a cooking surface.
- Cleaning while plugged in: This is a safety issue, not just a best practice. Always unplug before any cleaning.
- Ignoring the heating element: This is the number one cause of smoking air fryers. Out of sight, out of mind — but not out of consequences.
- Not letting parts dry completely before reassembling: Trapped moisture leads to mold, odor, and potential electrical issues. Air-dry fully or pat dry before reassembly.
- Soaking the main unit in water: Only the removable parts go in the water. The main body of the appliance — the part with the electronics — never gets submerged.
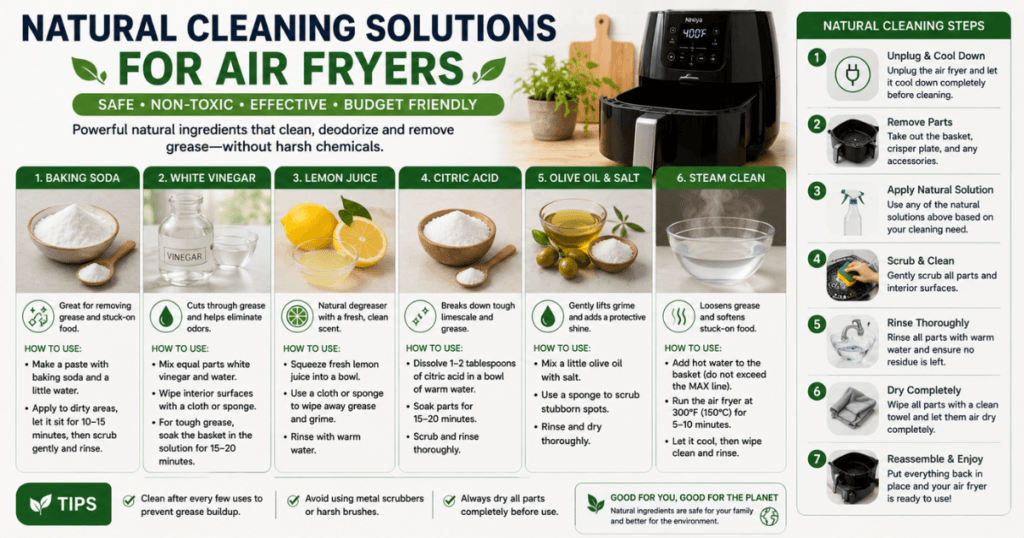
Natural Cleaning Solutions for Air Fryers
If you prefer to avoid dish soap or want a more eco-friendly approach, several natural alternatives work well for air fryer maintenance.
White vinegar: Diluted white vinegar (equal parts vinegar and water) is an effective degreaser and deodorizer. Dampen a cloth with the solution and wipe down the interior and basket after washing. The acidity cuts through grease and neutralizes food odors.
Pros: inexpensive, food-safe, widely available. Cons: strong smell while in use, not effective on heavy carbonized buildup.
Baking soda: Already covered in the deep-clean section, baking soda is the workhorse of natural air fryer cleaning. As a paste, it physically lifts burnt residue. As a powder left in the basket overnight, it absorbs odors.
Pros: gentle, effective, inexpensive. Cons: needs rinsing thoroughly or it leaves a white film.
Lemon steam method: This is a clever technique for interior deodorizing. Place a small oven-safe dish with water and a few slices of fresh lemon or lemon juice inside the basket.
Run the air fryer at 350°F for 5–10 minutes. The steam loosens light grease from the interior walls and leaves a fresh scent.
Pros: great for odor removal between deep cleans. Cons: not effective for heavy buildup, and the interior still needs to be wiped down afterward.
Important note on vinegar and the heating element: Never spray or apply vinegar directly to the heating element. The acidity can corrode metal components over time. Reserve vinegar for the basket, tray, and interior walls only.
How Frequently Should You Clean Your Air Fryer?
Component | Cleaning Frequency |
Basket | After every use |
Drip tray | After every use |
Interior walls | Weekly (or sooner if there are splatter marks) |
Heating element | Monthly (every 2–3 weeks for high-fat cooking) |
Exterior | Weekly |
The basket and tray take 5 minutes. The interior wipe takes another 2. There’s no excuse for letting the appliance go weeks without any attention — the buildup that accumulates in that time is exponentially harder to clean than what builds up after a single use.
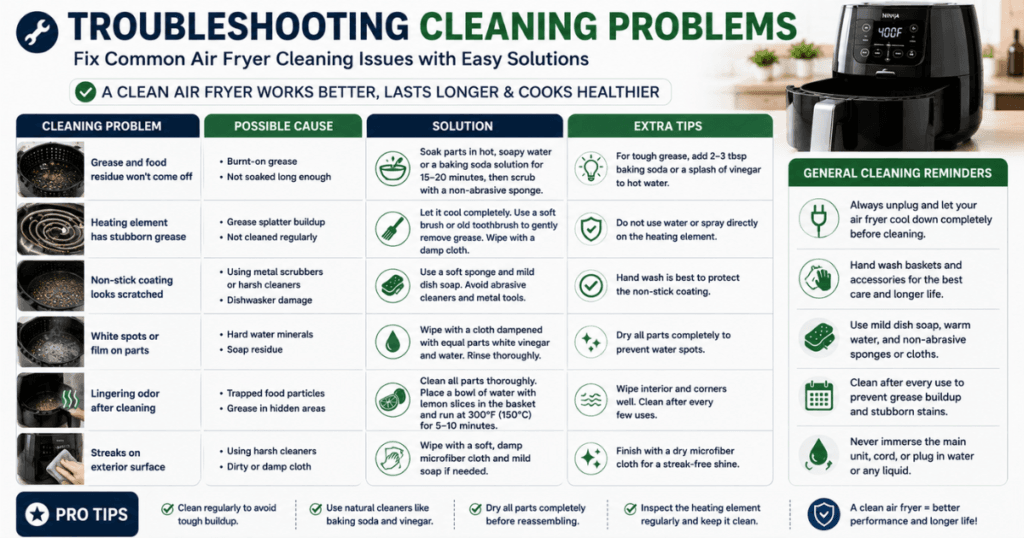
Troubleshooting Cleaning Problems
Removing burnt grease: If standard soaking hasn’t worked, use the baking soda + dish soap paste method. Apply, wait 20 minutes, then use a toothbrush.
For extremely stubborn spots on the basket, a commercial product like Bar Keepers Friend (used carefully on non-coated metal wire baskets only — not on non-stick surfaces) can cut through years of carbon buildup.
Eliminating bad odors: If your air fryer smells even after cleaning, the issue is likely residual odor absorbed into the basket or tray. Soak the basket overnight in a solution of white vinegar and water (1:1 ratio).
Then use the lemon steam method the next time you use the appliance. If odors persist, the non-stick coating may be permanently contaminated — a replacement basket is often available from the manufacturer.
Getting rid of smoke issues: Persistent smoke after cleaning usually means the heating element still has buildup. Repeat the element cleaning process, and this time let it dry longer before running the appliance.
Also check that the drip tray is properly seated — a misaligned tray allows grease to reach the heating element directly.
Restoring sticky baskets: If your basket has become sticky or tacky even after washing, the non-stick coating is likely degrading. Increased stick can happen from using too-high heat, using cooking sprays with propellants (these damage the coating — use brush-on oil instead), or scratching.
You can extend the life of a sticky basket by washing gently and avoiding spray oils, but if it’s flaking, replace it.
Pro Tips to Keep Your Air Fryer Cleaner Longer
These habits make a real difference between a clean appliance and a mess.
- Line the basket with parchment paper made for air fryers (perforated, so airflow isn’t blocked). It catches grease and crumbs before they contact the basket surface. Remove after cooking — don’t leave it inside.
- Use a small amount of oil on food rather than cooking spray. Aerosol sprays contain propellants and soy lecithin that break down non-stick coatings over time. Brush or mist oil directly onto food instead.
- Clean while warm, not hot. Once the appliance has cooled enough to touch safely (about 20 minutes), grease is still soft and wipes away easily. Fully cooled grease hardens and requires more effort.
- Never overfill the basket. Overloading traps moisture and forces grease into areas it normally wouldn’t reach. Cook in batches for both better results and an easier cleanup.
- Pour out grease from the tray after every cook — especially after cooking bacon, sausage, or fatty meats. Don’t let it cool and congeal in the drawer.
- Put a slice of bread in the basket when cooking pungent foods like fish or heavily seasoned meats. The bread absorbs some of the grease and odor before it can bake onto the surfaces.
- Wipe the interior immediately after removing food while the residual warmth is still present. A 30-second wipe now saves 10 minutes of scrubbing later.
- Check the vent holes on the back or sides of the unit monthly. Grease and lint can partially block these, affecting airflow and cooking performance. Wipe them clear with a dry cloth.
- Run a 5-minute lemon steam cycle monthly to keep odors from accumulating between deep cleans.
- Keep a microfiber cloth near your air fryer. Lowering the friction of the daily wipe-down to zero effort is the real secret to staying on top of maintenance.
Frequently Asked Questions
How do you clean an air fryer after every use?
After every use, remove the basket and tray once the unit has cooled. Wash both in warm soapy water with a soft sponge, rinse, and let air-dry.
Take a damp microfiber cloth and wipe the interior of the chamber. This routine takes 5–7 minutes and prevents buildup from accumulating.
Can I use vinegar to clean an air fryer?
Yes. Diluted white vinegar (equal parts vinegar and water) is safe for cleaning the basket, tray, and interior walls. It’s effective for degreasing and odor removal.
Do not apply vinegar directly to the heating element, and always rinse vinegar-cleaned surfaces with water before cooking.
How do I clean a very greasy air fryer?
Start by soaking the basket and tray in very hot, soapy water for 30–60 minutes. Apply a baking soda and dish soap paste to any stubborn spots and let it sit for 15–20 minutes before scrubbing. For the interior, wipe with a damp cloth and use baking soda paste on burnt residue.
Can Air Fryer Baskets Be Washed in the Dishwasher?
Many baskets are labeled dishwasher-safe by manufacturers. However, the high heat, alkaline detergents, and pressure of dishwasher cycles degrade non-stick coatings faster than hand washing.
If longevity matters, hand wash with warm soapy water and a soft sponge even when the dishwasher is technically an option. Always check your specific model’s manual.
How frequently should I clean the heating element?
Once a month is adequate for typical use. If you frequently cook fatty foods like bacon, chicken thighs, or greasy takeout-style items, clean the heating element every two to three weeks. Smoke during cooking is the clearest sign that it’s overdue.
How can I clean a Ninja air fryer?
The process is the same as any air fryer: remove and hand-wash the basket(s) after every use, wipe the interior weekly, and clean the heating element monthly with a soft brush.
For dual-zone Ninja models, clean both baskets separately and pay attention to the seam between the two zones where grease accumulates.
Why does my air fryer smoke after cleaning?
This is usually caused by remaining soap residue, trapped moisture, or incomplete cleaning of the heating element.
Run the empty appliance at 350°F for 3–5 minutes after cleaning to burn off any residue. If smoke continues, repeat the interior wipe-down and check the heating element specifically.
What removes baked-on grease from an air fryer?
A mixture of baking soda and dish soap forms a highly effective cleaning paste. Apply it to the affected surface, let it sit for 15–20 minutes to penetrate, then scrub gently with a soft brush or sponge and rinse thoroughly.
For wire baskets with carbon buildup, an overnight soak in hot soapy water combined with the paste method works exceptionally well.
Can I soak an air fryer basket overnight?
Yes — the removable basket and tray only. Fill your sink or a large bowl with hot, soapy water, submerge these parts, and let them soak. Overnight soaking is safe and effective for dissolving stubborn grease.
Do not soak the main unit — the body of the appliance with the electronics should never be submerged.
Is baking soda safe to use for cleaning an air fryer?
Absolutely. Baking soda is one of the safest and most effective cleaning agents for air fryers.
It’s mildly abrasive enough to lift burnt residue, alkaline enough to break down grease, and completely food-safe when rinsed away. Use it as a paste for scrubbing or sprinkle it in the basket to absorb odors overnight.
How do I remove grease from an air fryer?
Dish soap and warm water handle most grease effectively, especially with a soak. For tougher buildup, a baking soda paste or diluted white vinegar will cut through the grease.
Commercial degreasers like Dawn Platinum are the strongest option for very dirty baskets — apply, let penetrate, then scrub with a soft brush.
How often should an air fryer be deep cleaned?
Deep cleaning — interior walls, heating element, and thorough basket scrubbing — should happen once a month for regular users, or every two weeks if you use it daily or cook fatty foods frequently.
Daily maintenance keeps each deep clean quick; infrequent cleaning means each session is much harder work.
Is vinegar safe for air fryers?
Yes, when used properly. Diluted white vinegar is safe for the basket, tray, and interior surfaces. It’s effective at cutting grease and neutralizing food odors.
Avoid applying it to the heating element, and rinse surfaces with water after using vinegar before cooking.
Final Thoughts
A clean air fryer isn’t just about aesthetics — it performs better, cooks more evenly, and lasts significantly longer. The key insight is that maintenance is far easier than recovery.
A five-minute wash after each use is infinitely less work than a two-hour deep clean on a basket that hasn’t been touched in two months.
Start with the basics: wash the basket and tray after every use, wipe the interior weekly, and clean the heating element once a month.
Master those habits and you’ll likely never deal with a smoking, smelly, or underperforming air fryer again.
If you do fall behind, the soaking method and baking soda paste will handle almost anything — even very dirty wire baskets with serious carbon buildup.
Nothing in this guide requires special tools or expensive products. Everything you need is probably already under your kitchen sink.
Your air fryer is one of the most frequently used appliances in your kitchen. Treat it accordingly, and it’ll reward you with years of crispy, delicious results.
Key Takeaways
- Always unplug and fully cool before cleaning — safety first, every time.
- Wash the basket and tray after every use; deep clean monthly.
- The heating element is the most overlooked part and the main cause of smoke — clean it with a soft brush monthly.
- Baking soda paste is the most effective natural solution for baked-on grease and carbon buildup.
- Hand washing extends basket life longer than dishwasher use, even for dishwasher-safe models.
- Never spray liquids directly onto the heating element or submerge the main appliance unit.
- Ninja air fryers follow the same cleaning process as other brands, with special attention to the dual-zone seam on Dual Zone models.
- Consistency beats intensity — five minutes after every use beats an hour every few months.