cleaning kitchen cabinets
The Best Kitchen Cabinet Cleaner: Best Ways to Remove Grease Safely Without Damage
Introduction
You know that moment when you finally notice how bad your cleaning kitchen cabinets have gotten? Maybe it’s the sticky film near the stovetop, or that brownish-yellow buildup around the handles.
You run a cloth across the door and nothing really comes off — it just smears.
That’s grease. And once it layers up over weeks and months of cooking, it bonds to your cabinet finish like it owns the place.
The good news is that cleaning kitchen cabinets isn’t as hard as it looks once you know what actually works. The bad news? A lot of people grab the wrong cleaner and end up stripping the finish, warping wood, or leaving behind a cloudy residue that looks worse than the grime they started with.
This guide covers the best kitchen cabinet cleaner options — homemade and commercial — for every type of cabinet surface, plus the real techniques that make a difference.
Why Kitchen Cabinets Get So Dirty (and Sticky)
One common reason cabinets stay sticky even after wiping is that grease doesn’t just sit on the surface — it polymerizes.
Heat from cooking causes airborne oil particles to land on cabinet surfaces and essentially bake on over time. The result is that tacky, varnish-like coating that regular soap and water won’t cut through.
Cabinets near the stovetop take the worst of it. But even cabinets across the kitchen collect a combination of cooking vapors, dust, and fingerprints. Humidity from boiling water, steam from the dishwasher, and general kitchen activity all contribute.
The sticky residue you’re dealing with is usually a mix of:
- Polymerized cooking oils
- Dust and airborne particles embedded in the grease
- Residue from spray cleaners or polish left on the surface
- Natural skin oils from repeated touching around handles
Understanding what you’re cleaning helps you choose the right kitchen cabinet cleaner for the job.
What Makes a Good Kitchen Cabinet Cleaner?
A good cabinet cleaner does three things: breaks down grease, removes it without leaving residue, and doesn’t damage the finish underneath.
That rules out a surprising number of common cleaning products. Bleach, abrasive scrubs, and ammonia-based cleaners can dull or discolor cabinet finishes. Overly wet cleaning methods can warp wood or cause the finish to peel at the edges.
The best kitchen cabinet cleaners share these qualities:
- Degreasing power — usually from surfactants or mild acids like vinegar
- Low water content or fast-drying formula — to protect wood
- Non-abrasive formula — to avoid scratching finishes
- Residue-free cleaning — no film left behind after drying
- Safe for the specific finish — wood, paint, laminate, or thermofoil all react differently
Homemade vs. Commercial Cabinet Cleaners
Both work. The choice usually comes down to what you have on hand, how much buildup you’re dealing with, and the type of cabinet surface.
Homemade Cleaners
Homemade cabinet cleaners are affordable, safe to use, and easy to customize depending on the level of grease buildup. They work well for routine cleaning and light-to-moderate buildup.
Basic dish soap solution:
- 1 teaspoon of dish soap (Dawn or similar)
- 1 cup of warm water
- Optional: a few drops of white vinegar
This is the go-to for most homeowners. Dish soap is a mild degreaser and won’t harm most finishes.
Vinegar and water spray:
- 1 part white vinegar
- 1 part warm water
Effective for cutting through light grease and removing odors. However, avoid using straight vinegar on wood or painted cabinets — the acidity can dull finishes with repeated use.
Baking soda paste:
- 2 tablespoons baking soda
- A few drops of dish soap
- Just enough water to form a paste
Good for tackling stubborn grease spots without scratching. Apply gently with a soft cloth or old toothbrush.
Commercial Cleaners
For heavy grease buildup — especially that sticky, amber-colored residue near the stove — a dedicated degreaser for kitchen cabinets usually outperforms DIY solutions.
Look for products labeled as:
- Kitchen degreasers (spray or concentrate)
- Multi-surface kitchen cleaners
- Cabinet-specific cleaners
Popular options that work well include:
- Murphy Oil Soap — a classic for wood cabinets; gentle and effective
- Krud Kutter Kitchen Degreaser — stronger option for heavy grease, but rinse thoroughly
- Method All-Purpose Cleaner — plant-based, works on painted and laminate surfaces
- Rejuvenate Cabinet & Furniture Cleaner — popular for wood and laminate
Many homeowners accidentally damage cabinet finishes by using all-purpose bathroom or tile cleaners on their kitchen cabinets. These often contain chlorine or harsh acids not suited for wood or painted surfaces.
Best Cleaners for Each Cabinet Type
Wood Cabinets
Wood is the most sensitive cabinet material. It absorbs water, reacts to harsh chemicals, and can warp, crack, or lose its finish if cleaned incorrectly.
Best approach: Slightly damp cloth with dish soap solution, followed immediately by a dry cloth.
- Never soak wood cabinets with water
- Avoid ammonia, bleach, or straight vinegar
- Murphy Oil Soap is a trusted wood-safe cleaning option
- After cleaning, dry surfaces immediately and consider applying a thin coat of furniture polish or mineral oil to restore any lost sheen
For heavy grease: A small amount of baking soda paste applied with a soft cloth and rinsed quickly works well. Don’t scrub hard — let the baking soda do the work.
Painted Cabinets
Painted cabinets are more durable than bare wood but still vulnerable to chipping, discoloration, and water damage if cleaned improperly.
Best approach: Mild dish soap solution on a microfiber cloth. Wring the cloth nearly dry before wiping.
- Avoid scrub pads or anything abrasive — they’ll scratch paint
- Vinegar-water solutions work fine for painted surfaces in moderation
- Stay away from acetone or alcohol-based cleaners, which can strip paint
- For scuff marks near handles, a magic eraser (melamine foam) works — but use it gently and only where needed
Laminate Cabinets
Laminate is more forgiving than wood or paint. The surface is non-porous, which means it resists moisture and doesn’t absorb grease as deeply.
Best approach: A mild all-purpose kitchen cleaner or dish soap solution.
- Avoid using harsh cleaners, as they can scratch the surface.
- Laminate responds well to vinegar-water solutions
- For stubborn spots, a small amount of rubbing alcohol on a cloth can lift residue without damage
- Avoid using excessive heat, such as steam cleaners, as it may cause the laminate to lift or bubble.
White Kitchen Cabinets
White cabinets show every smudge and grease spot, and they’re also prone to yellowing over time from heat and UV exposure.
Best approach: A baking soda and dish soap paste for stained areas, followed by a rinse with clean water.
- Avoid bleach — it can cause yellowing or damage the finish over time
- Magic erasers are effective on white cabinets for stubborn marks
- For yellowing that isn’t dirt-related, a diluted hydrogen peroxide solution (3%) can help brighten surfaces — test in a hidden area first
- Clean more frequently to prevent buildup from discoloring the surface
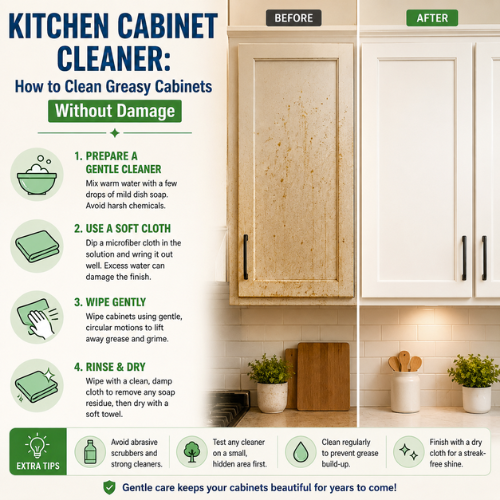
How to Remove Grease from Kitchen Cabinets
Heavy grease requires a bit more patience than routine cleaning kitchen cabinets. Here’s a step-by-step approach that works without damaging the finish.
What you need:
- Dish soap or a dedicated degreaser for kitchen cabinets
- Warm water
- Microfiber cloths
- A soft-bristle brush or old toothbrush for corners and crevices
- Dry towels
Step 1: Start with warm soapy water
Mix dish soap into warm water and dampen a microfiber cloth. Start with the least aggressive cleaner and work up from there. Many times, warm dish soap solution is all you need.
Step 2: Let it sit for 1–2 minutes
Apply the solution and allow it to sit before wiping it off. This gives the surfactants time to loosen the grease rather than just moving it around.
Step 3: Wipe in the direction of the grain
On wood, always wipe in the direction of the wood grain to avoid streaks and micro-scratches. On painted or laminate surfaces, circular motions are fine for stubborn spots.
Step 4: Use a soft brush on corners and edges
Grease loves to collect in the grooves of raised cabinet doors and around hinges. An old toothbrush or soft detail brush makes quick work of these spots.
Step 5: Clean with a soft, damp cloth.
Remove any soap residue with a separate cloth dampened with plain water.
Step 6: Dry thoroughly
This is the step most people overlook — and the one that leads to the most damage. Dry wood and painted cabinets immediately and completely. Letting water sit encourages warping and finish failure.
Professional cleaners usually avoid excessive water because even small amounts left on wood grain can cause swelling over time. The goal is a “barely damp” application, not a wet one.
Natural Cleaning Solutions That Work
Natural doesn’t mean weak. These kitchen-safe ingredients tackle grease and grime effectively without the chemical load.
White Vinegar
Vinegar’s mild acidity cuts through grease and dissolves mineral deposits. When mixed 1:1 with water, it is generally safe for most cabinet surfaces and does not leave any residue behind. Avoid using it full-strength on wood or painted surfaces.
Dish Soap
Regular dish soap — especially Dawn — is a surprisingly powerful degreaser. The surfactants it contains are designed to break down cooking oils, making it one of the most practical kitchen cabinet cleaners you already have.
Baking Soda
Baking soda is a mild abrasive that scrubs without scratching. Mixed into a paste, it’s excellent for stubborn spots on white cabinets or painted surfaces. Its alkaline nature also helps neutralize acidic grease residue.
Lemon Juice
Lemon juice works similarly to vinegar — its citric acid cuts grease and leaves a clean, fresh scent. Use diluted with water the same way you’d use vinegar. Avoid leaving it on wood for extended periods.
Olive Oil + Vinegar Combo
This sounds counterintuitive, but a 1:2 ratio of olive oil to vinegar actually works well as a wood cabinet cleaner and conditioner. The vinegar acts as a cleaner, while the oil nourishes the wood. It’s a popular trick among woodworkers for a reason.
Ingredients and Products to Avoid
Not everything in your cleaning cabinet belongs on your kitchen cabinets.
Avoid these on cabinet surfaces:
- Bleach — discolors paint and finishes, degrades wood over time
- Ammonia — found in many glass cleaners (like Windex); can strip cabinet finishes
- Abrasive scrubbing pads — leave micro-scratches that collect dirt faster
- Steam cleaners — excessive heat can warp wood and cause laminate to separate
- Undiluted essential oils — some oils, particularly citrus extracts, can damage finishes at high concentrations
- All-purpose tile or bathroom cleaners — often contain acids designed for ceramic, not wood or paint
Best Tools and Cloths for Cabinet Cleaning
The tool matters as much as the cleaner. Using the wrong cloth can scratch finishes or push grease around without removing it.
Microfiber cloths — the best all-around option. They trap grease and dust rather than spreading it, work well damp or dry, and are gentle enough for any cabinet surface.
Soft cotton cloths or old T-shirts — a good alternative to microfiber. Avoid anything with rough stitching or synthetic textures.
Soft-bristle brushes — perfect for carved details, raised panel grooves, and areas around hinges. A clean paint brush or soft dish brush works great.
Old toothbrushes — ideal for tight corners and crevices.
Magic erasers (melamine foam) — effective on stubborn marks on white or painted cabinets, but use lightly. They’re mildly abrasive and can dull gloss finishes if rubbed too aggressively.
Avoid: Steel wool, scouring pads, rough sponge backs, and any scrubbing tool with a scratchy texture.
How Often Should You Clean Kitchen Cabinets?
For most households, a quick wipe-down every one to two weeks keeps grease and grime from building up. A deeper clean every one to three months — paying attention to the interior shelves, cabinet tops, and around the stove — keeps everything in good shape.
If you cook frequently, especially frying or stir-frying, you’ll want to wipe down the cabinet faces near the stove after each cooking session. That five-minute habit makes a massive difference over time.
Quick guide:
Weekly or bi-weekly: Wipe cabinet faces, especially near the stove and sink
Monthly: Clean handles, edges, and grooves more thoroughly
Quarterly: Full cleaning including interiors, tops of upper cabinets, and behind appliances
How Professionals Clean Greasy Cabinets
Professional house cleaners approach kitchen cabinets differently than most homeowners. A few patterns stand out:
They work top to bottom. Upper cabinets first, lower cabinets last. Drips fall down, not up.
They use two cloths. One damp cloth to apply the cleaner, one dry to wipe clean. This prevents redepositing dissolved grease back onto surfaces.
They let the cleaner dwell. Spray or apply, wait a minute, then wipe. Trying to clean on contact is harder work and less effective.
They don’t oversaturate. Professional cleaners use the minimum amount of moisture needed. Excess water is the enemy of wood and painted cabinets.
They address handles separately. Cabinet hardware — especially around handles — collects oil from hands. A targeted cleaning of these areas using a somewhat stronger solution helps the entire cabinet appear cleaner.
They finish by drying. Every professional cleaning ends with a dry cloth to remove any remaining moisture and prevent water spots.
How to Prevent Grease Buildup in Kitchens
The best kitchen cabinet cleaning routine is one you don’t have to do very often. Prevention matters.
Use your range hood. A quality range hood vented to the outside captures a significant portion of airborne grease before it settles on surfaces. Make sure yours is actually vented out (not recirculating) and that the filters are clean.
Wipe down after frying. After any high-heat cooking with oil — stir-frying, pan searing, deep frying — take two minutes to wipe down the nearest cabinet faces. Grease is much easier to remove before it polymerizes.
Keep lids on pots. Covered pots release far less steam and oil vapor into the kitchen. Simple but effective.
Clean the stovetop regularly. Residual grease on the stovetop becomes airborne again the next time you cook. A clean stovetop means less grease migrating to your cabinets.
Apply a protective wax or polish. On wood cabinets, a thin coat of cabinet wax or paste wax creates a barrier that grease can’t bond to as easily. Reapply every few months.
FAQ
What is the best kitchen cabinet cleaner?
For most households, a simple mix of dish soap and warm water works well for regular cleaning. For heavier grease, Murphy Oil Soap (on wood) or a spray degreaser like Krud Kutter (on painted or laminate) is more effective. The “best” cleaner depends on your cabinet material and how much buildup you’re dealing with.
How do I remove grease from kitchen cabinets without damaging them?
Use a lightly damp microfiber cloth with a dish soap solution. Let it sit on the greasy area for 1–2 minutes, then wipe gently in the direction of the wood grain. Follow with a dry cloth immediately. For stubborn spots, baking soda paste works without scratching.
What should I not use to clean kitchen cabinets?
Avoid bleach, ammonia-based cleaners (like Windex), undiluted vinegar on wood, abrasive scrubbing pads, and steam cleaners. These can damage finishes, cause discoloration, or warp wood.
How do I clean sticky kitchen cabinets?
Sticky cabinets usually have polymerized grease on them. Warm dish soap solution left to dwell for a minute usually handles light stickiness.
For heavy buildup, a diluted dish soap and baking soda paste, or a kitchen degreaser spray, works better. Always dry thoroughly after cleaning.
How often should I clean kitchen cabinets?
Wipe down cabinet faces every one to two weeks. Do a deeper cleaning of handles, grooves, and edges monthly. Clean cabinet interiors and tops quarterly, or more often if you cook frequently.
How do I clean white kitchen cabinets without yellowing them?
Use a baking soda and dish soap paste for stained areas, and rinse with clean water. Avoid bleach, which can paradoxically cause yellowing over time.
For existing yellowing, a diluted 3% hydrogen peroxide solution (tested in a hidden spot first) can help brighten white cabinets.
What removes grease from painted cabinets?
Dish soap solution is usually enough for regular buildup. For heavier grease on painted surfaces, a diluted all-purpose degreaser or baking soda paste works well.
Can I use baking soda to clean kitchen cabinets?
Yes. Baking soda mixed with a little dish soap and water makes an effective, non-abrasive paste for tackling stubborn spots. It’s particularly useful on white cabinets where discoloration has set in.
Conclusion
Keeping cleaning kitchen cabinets doesn’t have to be a major project if you stay on top of it. A regular wipe-down with dish soap solution, the right cloth, and a dry finish afterward is all most cabinets need. For bigger grease jobs, a dedicated degreaser or baking soda paste will handle almost anything.
The most important thing is matching the cleaner to the cabinet material. Wood, painted, and laminate surfaces all respond differently, and using the wrong product can cause more damage than the grease would have.
Start simple. Dish soap and warm water is genuinely effective for most situations and safe for every cabinet type. Add vinegar, baking soda, or a commercial degreaser when the job calls for it — and always finish by drying completely.
Your cabinets will thank you.